了解 Vue3
官方文档: https://staging-cn.vuejs.org
1. 了解相关信息
- 2年多开发, 100+位贡献者, 2600+次提交, 600+次PR(Pulll Request)
- Vue3支持vue2的大多数特性
- 更好的支持Typescript
2. 性能提升
- 打包大小减少41%
- 初次渲染快55%, 更新渲染快133%
- 内存减少54%
- 重写虚拟DOM的实现和Tree-Shaking
3. Composition API
- 也称组合 API
- setup
- ref 和 reactive
- computed 和 watch
- 新的生命周期函数
- 自定义hooks函数
4. 其它新增特性
- Teleport - 瞬移组件的位置
- Suspense - 异步加载组件的loading界面
- 全局API的修改
创建vue3项目
1. 使用 vue-cli 创建
1
2
3
4
5
6
7
8
9
10
11
12
13
|
npm install -g @vue/cli --- 最好是在cmd中执行---system32/cmd---开始---cmd
vue --version
vue create <project-name>
vue.config.json文件可以配置
devServer: {
host: 'localhost',
port:8000,
open:true
}
|
然后的步骤
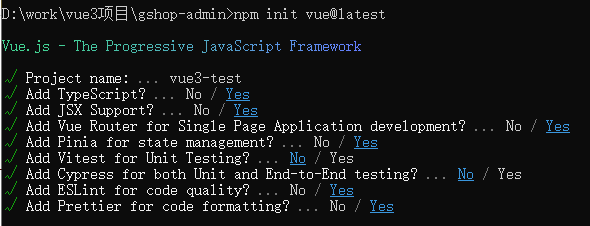
- Please pick a preset - 选择 Manually select features
- Check the features needed for your project - 多选择上 TypeScript && Router && Vuex,特别注意点空格是选择,点回车是下一步
- Choose a version of Vue.js that you want to start the project with - 选择 3.x (Preview)
- Use class-style component syntax - 直接回车
- Use Babel alongside TypeScript - 直接回车
- Pick a linter / formatter config - 直接回车
- Use history mode for router? - 直接回车
- Pick a linter / formatter config - 直接回车
- Pick additional lint features - 直接回车
- Where do you prefer placing config for Babel, ESLint, etc.? - 直接回车
- Save this as a preset for future projects? - 直接回车
2. 使用 vite 创建
Vite 是一个由原生 ESM 驱动的 Web 开发构建工具。在开发环境下基于浏览器原生 ES imports 开发,在生产环境下基于 Rollup 打包。相比较webpack打包环境, 启动快很多,文档:https://cn.vitejs.dev/
- 快速的冷启动,不需要等待打包操作;
- 即时的热模块更新,替换性能和模块数量的解耦让更新飞起;
- 真正的按需编译,不再等待整个应用编译完成,这是一个巨大的改变。
1
2
3
4
5
6
7
8
9
10
11
12
13
14
15
16
17
| 兼容性注意
Vite 需要 Node.js 版本 >= 14.18.0。然而,有些模板需要依赖更高的 Node 版本才能正常运行,当你的包管理器发出警告时,请注意升级你的 Node 版本。
npm create vite@latest 项目名称
yarn create vite
npm init vite-app <project-name> 老版本
cd <project-name>
npm install
npm run dev
npm create vite@latest my-vue-app --template vue
npm create vite@latest my-vue-app -- --template vue
|
初识Vue3
1.源码分析
1
2
3
4
5
6
7
8
9
10
11
12
13
14
15
16
17
18
19
20
21
22
23
24
25
26
27
| <template>
<h2>{{msg}}</h2>
<h3>{{showMsg()}}</h3>
</template>
<script lang="ts">
/*
v3.x中组件内部的结构里是可以没有根标签,因此,可以看出,渲染速度肯定/一定/必须地比v2.x的页面渲染速度快,效率高,提升了体验,很舒服
v3.x语法中,html标签并不需要那么严谨(并不是好事)
v3.x支持ts语法
v3.x支持v2.x语法
defineComponent是一个函数,一般情况传入的是一个选项配置对象(vue2.x中的组件文件中的 组件对象),返回的就是该组件对象,可以直接当成组件使用
*/
import { defineComponent } from 'vue';
export default defineComponent({
name: 'App',
data(){
return {
msg:'冰激淋离开了冰箱,越走越远,后来化了,后悔了,于是掉头回来找到了冰箱,并且认错'
}
},
methods:{
showMsg(){
console.log('冰箱原谅说:上来吧,自己冻')
}
}
});
</script>
|
Composition API使用
1. setup
setup 函数是一个新的组件选项。作为在组件内使用 Composition API 的入口点。
创建组件实例,然后初始化 props ,紧接着就调用setup 函数。从生命周期钩子的视角来看,它会在 beforeCreate 钩子之前被调用
1
2
3
4
5
6
7
8
9
10
11
12
13
14
15
16
17
18
19
20
21
22
23
24
25
26
27
28
| <template>
<h3>{{count}}</h3>
<h3>{{showMsg()}}</h3>
<button @click="changeCount">测试</button>
</template>
<script lang="ts">
import { defineComponent, ref } from 'vue'
export default defineComponent({
name: 'App',
beforeCreate () { // 生命周期钩子
console.log('beforeCreate()')
},
// 函数如果返回对象, 对象中的属性或方法, 模板中可以直接使用
// 组合API:我们可以理解为,内部可以放很多的组合
setup() {
console.log('setup()', this) // 在beforeCreate之前执行,this必然是undefined
// 普通变量---虽然能够在页面中使用,但是,这玩意儿不是响应式的数据,意义不是特别大
let count = 100
const showMsg =()=>{
console.log('我喜欢吃大豆腐沾臭豆腐拌蒜,豪哥说')
}
return {
count,
showMsg
}
}
})
</script>
|
2. ref
作用: 定义一个数据的响应式,接受一个参数值并返回一个响应式且可改变的 ref 对象,ref 对象拥有一个指向内部值的单一属性 value
组合式API函数ref,函数执行传入的参数一般为基本类型数值,函数执行会返回,RefImpl这个类的实例->对象
如果传入 ref 的是一个对象,将调用 reactive 方法对内部的value进行深层响应转换。
当 ref 作为渲染上下文的属性返回(即在setup() 返回的对象中)并在模板中使用时,它会自动解套,无需在模板内额外书写 .value
语法: const xxx = ref(initValue): 需要引入ref
- 创建一个包含响应式数据的引用(reference)对象
- js中操作数据: xxx.value
- 模板中操作数据: 不需要.value
一般用来定义一个基本类型的响应式数据
1
2
3
4
5
6
7
8
9
10
11
12
13
14
15
16
17
18
19
20
21
22
23
24
25
26
27
28
29
| <template>
<div class="about">
<h2>{{count}}</h2>
<hr>
<button @click="increment">更新</button>
</div>
</template>
<script lang="ts">
import {
ref
} from "vue"
export default {
setup() {
// 包含响应式数据的引用对象
const count = ref(0) // count是一个引用对象, 内部包含存储数据的value属性
console.log(count, count.value)
// 更新响应式数据的函数
const increment = () => {
count.value++
}
return { // 对象中的属性和方法, 模板可以直接访问
count,
increment
}
}
}
</script>
|
3. reactive
- 作用: 定义多个数据的响应式
- const proxy = reactive(obj): 接收一个普通对象然后返回该普通对象的响应式代理对象
- 响应式转换是“深层的”:会影响对象内部所有嵌套的属性
- 内部基于 ES6 的
Proxy 实现,通过代理对象操作源对象内部数据都是响应式的
- 修改数据时,只能单独修改
obj.a = 2
- 或者使用
Object.assign(obj,{a:2, b:3})
1
2
3
4
5
6
7
8
9
10
11
12
13
14
15
16
17
18
19
20
21
22
23
24
25
26
27
28
29
30
31
32
33
34
35
36
37
38
39
40
| <template>
<h2>reactive的使用</h2>
<h3>名字:{{obj.name}}</h3>
<h3>年龄:{{obj.age}}</h3>
<h3>媳妇:{{obj.wife}}</h3>
<button @click="changeData">测试数据</button>
</template>
<script lang="ts">
import { defineComponent, reactive} from 'vue'
export default defineComponent({
name: 'App',
setup() {
// 目标对象
const target ={
name:'小强',
age:20,
wife:{
name:'小甜甜',
age:20,
car:['奔驰','奥迪','宝马']
}
}
// 代理对象,返回的是一个Proxy类型的对象
// reactive用来定义引用类型的响应式数据的方法,ref用来定义基本类型数据的响应式数据
// reactive响应式数据的变化影响是深层次的
// 修改代理数据,目标对象的数据是会发生变化的,修改目标数据,代理数据是不会变化的
const obj = reactive(target)
const changeData=()=>{
// obj.name+='==='
// obj.wife.name+='==='
// obj.wife.car[3]='奥拓'
target.name+='==='
}
return {
obj,
changeData
}
},
})
</script>
|
4. 比较Vue2与Vue3的响应式(重要)
1) Vue2的响应式核心:
- 对象: 通过defineProperty对对象的已有属性值的读取和修改进行劫持(监视/拦截)
- 数组: 通过重写数组更新数组一系列更新元素的方法来实现元素修改的劫持
1
2
3
4
| Object.defineProperty(data, 'count', {
get () {},
set () {}
})
|
- 问题
- 对象直接新添加的属性或删除已有属性, 界面不会自动更新
- 直接通过下标替换元素或更新length, 界面不会自动更新 arr[1] = {}
2) Vue3的响应式核心:
通过Proxy(代理): 拦截对data任意属性的任意(13种)操作, 包括属性值的读写, 属性的添加, 属性的删除等…
通过 Reflect(反射): 动态对被代理对象的相应属性进行特定的操作
文档:
https://developer.mozilla.org/zh-CN/docs/Web/JavaScript/Reference/Global_Objects/Proxy
https://developer.mozilla.org/zh-CN/docs/Web/JavaScript/Reference/Global_Objects/Reflect
Proxy:
第一个参数:监听的对象,
第二个参数:配置对象{get(监听的对象,属性名){},set(){}}
Reflect
第一个参数:target:需要取值的目标对象
第二个参数:prop:需要获取的属性值
第三个参数:value:修改后的值
1
2
3
4
5
6
7
8
9
10
11
12
13
14
15
16
17
18
19
20
21
22
|
```javascript
// Proxy+Reflect 实现响应式数据
new Proxy(data, {
// 拦截读取属性值
get (target, prop) {
return Reflect.get(target, prop)//在target身上读取prop属性
},
// 拦截设置属性值或添加新属性
// value:修改的属性值
set (target, prop, value) {
return Reflect.set(target, prop, value)//将target身上prop属性修改为value
},
// 拦截删除属性
deleteProperty (target, prop) {
return Reflect.deleteProperty(target, prop)
}
})
proxy.name = 'tom'
|
1
2
3
4
5
6
7
8
9
10
11
12
13
14
15
16
17
18
19
20
21
22
23
24
25
26
27
28
29
30
31
32
33
34
35
36
37
38
39
40
41
42
43
44
45
46
47
48
49
50
51
52
53
54
55
56
57
58
59
60
61
62
| <!DOCTYPE html>
<html lang="zh">
<head>
<meta charset="UTF-8">
<meta name="viewport" content="width=device-width, initial-scale=1.0">
<meta http-equiv="X-UA-Compatible" content="ie=edge">
<title>玉树临风美少年,揽镜自顾夜不眠 </title>
</head>
<body>
<script type="text/javascript">
const user = {
name: '佐助',
age: 20,
wife: {
name: '小樱',
age: 19
}
}
const proxyUser = new Proxy(user, {
get(target, prop) {
console.log('劫持get执行了',prop)
return Reflect.get(target, prop)
},
set(target, property, value) {
console.log('劫持set执行了',property, value)
return Reflect.set(target, property, value)
},
deleteProperty(target, property) {
console.log('delete执行了',property)
return Reflect.deleteProperty(target, property)
}
})
proxyUser.wife.name += '==='
console.log(proxyUser)
delete proxyUser.wife.name
console.log(proxyUser)
console.log(proxyUser===user)
console.log(proxyUser.name, proxyUser.age)
proxyUser.name = 'tom'
proxyUser.age = 20
console.log(user)
proxyUser.sex = '男'
console.log(user)
delete proxyUser.sex
console.log(user)
</script>
</body>
</html>
|
5. setup细节
setup执行的时机
- 在beforeCreate之前执行(一次), 此时组件对象还没有创建
- this是undefined, 不能通过this来访问data/computed/methods / props
- 其实所有的composition API相关回调函数中也都不可以
setup的返回值
- 一般都返回一个对象: 为模板提供数据, 也就是模板中可以直接使用此对象中的所有属性/方法
- 返回对象中的属性会与data函数返回对象的属性合并成为组件对象的属性
- 返回对象中的方法会与methods中的方法合并成功组件对象的方法
- 如果有重名, setup优先,现在是报错了
- 注意:
- 一般不要混合使用: methods中可以访问setup提供的属性和方法, 但在setup方法中不能访问data和methods
- setup不能是一个async函数: 因为返回值不再是return的对象, 而是promise, 模板看不到return对象中的属性数据
setup的参数
- setup(props, context) /
setup(props, {attrs, slots, emit})
- props: 包含props配置声明且传入了的所有属性的对象
- attrs: 包含没有在props配置中声明的属性的对象, 相当于 this.$attrs
- slots: 包含所有传入的插槽内容的对象, 相当于 this.$slots
- emit: 用来分发自定义事件的函数, 相当于 this.$emit
1
2
3
4
5
6
7
8
9
10
11
12
13
14
15
16
17
18
19
20
21
22
23
24
25
26
27
28
29
30
| <!--App父级组件-->
<template>
<h2>App父级组件,setup的细节</h2>
<h3>msg:{{msg}}</h3>
<button @click="msg+='==='">更新数据</button>
<Child :msg="msg" msg5="测试" @xxx="xxx" />
</template>
<script lang="ts">
import { defineComponent, ref } from 'vue'
import Child from './components/Child.vue'
export default defineComponent({
name: 'App',
// 注册组件
components: {
Child
},
setup() {
// 普通类型的响应式数据
const msg = ref('what are you no sha lei')
// 永爱更新普通数据
const xxx = (txt:string) => {
msg.value += txt
}
return {
msg,
xxx
}
}
})
</script>
|
1
2
3
4
5
6
7
8
9
10
11
12
13
14
15
16
17
18
19
20
21
22
23
24
25
26
27
28
29
30
31
32
33
34
35
36
37
38
39
40
41
42
43
44
45
46
47
48
49
50
51
52
53
54
55
56
57
58
| <!--Child子级组件-->
<template>
<h3>Child子级组件</h3>
<h3>父级传过来的msg:{{msg}}</h3>
<button @click="updateParentMsg1">修改父级组件中的数据</button>
</template>
<script lang="ts">
// 引入定义组件的api
import { defineComponent } from 'vue'
// 定义组件并暴露
export default defineComponent({
name: 'Child',
props: ['msg'],
// props仍然是一个代理对象,内部有父级组件向子级组件传递进来的数据
// props参数中的数据是否存在,要看当前的子级组件是否曾经使用props进行接收
// 父级组件传入进来的数据,第一要通过props进行接收,虽然接收了,数据在组件的实例对象中,但是setup执行的时候,内部是没有this的
// console.log(props)
// context中有attrs对象,存储的是父级组件向子级组件传入进来的数据,但是这个数据没有使用props进行接收,相当于vue2.x中的this.$attrs属性
// console.log(context)
// context.emit('xxx','嘎嘎')
// console.log('setup执行了',this) // this是undefined,原因:setup执行的时候,组件实例对象还没创建
setup(props, context) {
// 用来获取父级组件传递过来的数据,需要子级组件使用props进行接收
console.log(props.msg)
// 用来获取父级组件传递过来的数据,没有使用props接收的数据
console.log(context.attrs.msg1)
// 按钮点击事件的回调函数,内部分发父级组件传递过来的自定义事件
const updateParentMsg1 = () => {
context.emit('updateMsg', '真香啊')
}
return {
updateParentMsg1
}
}
})
/*
setup执行的时机
在beforeCreate之前执行(一次), 此时组件对象还没有创建
this是undefined, 不能通过this来访问data/computed/methods / props
其实所有的composition API相关回调函数中也都不可以
setup的返回值
一般都返回一个对象: 为模板提供数据, 也就是模板中可以直接使用此对象中的所有属性/方法
返回对象中的属性会与data函数返回对象的属性合并成为组件对象的属性
返回对象中的方法会与methods中的方法合并成功组件对象的方法
如果有重名, setup优先
注意:
一般不要混合使用: methods中可以访问setup提供的属性和方法, 但在setup方法中不能访问data和methods
setup不能是一个async函数: 因为返回值不再是return的对象, 而是promise, 模板看不到return对象中的属性数据(暂且这么理解,后期会有不同的解释)
vue3.x中组件的实例对象this其实也是一个Proxy类型的代理对象
setup(props, context) / setup(props, {attrs, slots, emit})
props: 包含props配置声明且传入了的所有属性的对象
attrs: 包含没有在props配置中声明的属性的对象, 相当于 this.$attrs
slots: 包含所有传入的插槽内容的对象, 相当于 this.$slots
emit: 用来分发自定义事件的函数, 相当于 this.$emit
*/
</script>
|
6. reactive与ref细节
- 是Vue3的 composition API中2个最重要的响应式API
- ref用来处理基本类型数据, reactive用来处理对象(递归深度响应式)
- 如果用ref对象/数组, 内部会自动将对象/数组转换为reactive的代理对象
- ref内部: 通过给value属性添加getter/setter来实现对数据的劫持
- reactive内部: 通过使用Proxy来实现对对象内部所有数据的劫持, 并通过Reflect操作对象内部数据
- ref的数据操作: 在js中要.value, 在模板中不需要(内部解析模板时会自动添加.value)
1
2
3
4
5
6
7
8
9
10
11
12
13
14
15
16
17
18
19
20
21
22
23
24
25
26
27
28
29
30
31
32
33
34
35
36
37
38
39
40
41
42
43
44
45
46
47
| <template>
<h2>reactive与ref-细节</h2>
<h3>m1:{{m1}}</h3>
<h3>m2:{{m2}}</h3>
<h3>m3:{{m3}}</h3>
<hr color="red" />
<button @click="update">更新数据</button>
</template>
<script lang="ts">
import { defineComponent, reactive, ref } from 'vue'
export default defineComponent({
name: 'App',
setup() {
// 用来定义基本类型的响应式数据
const m1 = ref('abc')
// 用来定义复杂类型的响应式数
const m2 = reactive({
name: '小强',
wife: {
name: '小甜甜'
}
})
const m3 = ref({
name: '小强',
wife: {
name: '小甜甜'
}
})
console.log(m3)
// 更新数据的方法
const update = () => {
// console.log('哈哈')
// m1.value+='===' // 可以正常渲染---响应式的数据
// m2.wife.name+='=====' // 同上
console.log(m1)
m3.value.wife.name+='====='
}
return {
m1,
m2,
m3,
update
}
}
})
// ref中可以放入复杂类型的数据,返回来的数据是Ref类型的,但是内部的数据已经成为Proxy类型的代理对象数据
</script>
|
7. 计算属性与监视
1
2
3
4
5
6
7
8
9
10
11
12
13
14
15
16
17
18
19
20
21
22
23
24
25
26
27
28
29
30
31
32
33
34
35
36
37
38
39
40
41
42
43
44
45
46
47
48
49
50
51
52
53
54
55
56
57
58
59
60
61
62
63
64
65
66
67
68
69
70
71
72
73
74
75
76
77
78
79
80
81
82
83
84
85
86
87
| <template>
<h2>watch和computed及watchEffect函数</h2>
<fieldset>
<legend>姓名操作</legend>
姓氏:<input type="text" placeholder="请输入姓氏" v-model="user.firstName" /><br />
名字:<input type="text" placeholder="请输入名字" v-model="user.lastName" /><br />
</fieldset>
<fieldset>
<legend>计算属性和监视的演示</legend>
姓名:<input type="text" placeholder="显示姓名" v-model="fullName1" /><br />
姓名:<input type="text" placeholder="显示姓名" v-model="fullName2" /><br />
姓名:<input type="text" placeholder="显示姓名" v-model="fullName3" /><br />
</fieldset>
</template>
<script lang="ts">
import {
computed,
defineComponent,
reactive,
ref,
watch,
watchEffect
} from 'vue'
export default defineComponent({
name: 'App',
setup() {
// 定义响应式对象,存储姓氏和名字
const user = reactive({
firstName: '东方',
lastName: '不败'
})
// 通过计算属性的方式实现 第一个姓名的操作效果
const fullName1 = computed(() => {
// get的简写形式
return user.firstName + '_' + user.lastName
})
// 通过计算属性的方式实现 第二个姓名的操作效果
const fullName2 = computed({
get() {
return user.firstName + '_' + user.lastName
},
set(val: string) {
// ts的语法
const names = val.split('_')
user.firstName = names[0]
user.lastName = names[1]
}
})
// 通过监视的方式实现第三个姓名的操作
const fullName3 = ref('')
// 使用watch进行数据监视
watch(user, ({ firstName, lastName }) => {
fullName3.value = firstName + '_' + lastName
},{immediate:true,deep:true}) // 默认执行一次,深度监视
// watchEffect(()=>{
// fullName3.value = user.firstName + '_' + user.lastName
// }) // 默认就会执行一次
// watchEffect(() => {
// const names = fullName3.value.split('_')
// user.firstName = names[0]
// user.lastName = names[1]
// })
// watch也可以同时监视多个数据
// watch([user.firstName, user.lastName, fullName3], () => {
// console.log('=====')
// })
// watch另一种写法
// watch([()=>user.firstName, ()=>user.lastName, fullName3], () => {
// console.log('=====')
// })
return {
user,
fullName1,
fullName2,
fullName3
}
}
})
</script>
|
8. toRef
作用:创建一个 ref 对象,其value值指向另一个对象中的某个属性。
语法:const name = toRef(person,'name')
应用: 要将响应式对象中的某个属性单独提供给外部使用时。
扩展:toRefs 与toRef功能一致,但可以批量创建多个 ref 对象,语法:toRefs(person)
问题: reactive的值在模板中使用时,需要一层层的点.很麻烦,而且reactive 对象取出的所有属性值都是非响应式的
解决: 利用 toRefs 可以将一个响应式 reactive 对象的所有原始属性转换为响应式的 ref 属性
1
2
3
4
5
6
7
8
9
10
11
12
13
14
15
16
17
18
19
20
21
22
23
24
25
26
27
28
29
30
31
32
33
34
35
36
37
38
39
| <template>
<div>
<!-- 原始写法 -->
<h4>{{ person.name }}</h4>
<h4>年龄:{{ person.age }}</h4>
<h4>{{ person.job.j1.salary }}</h4>
<button @click="person.age++">修改年龄</button>
<hr />
<!-- toRefs的写法 -->
<h5>{{ name }}</h5>
<h5>{{ age }}</h5>
<h5>{{ job.j1.salary }}</h5>
</div>
</template>
<script lang="ts">
import { defineComponent, reactive, toRefs } from 'vue'
export default defineComponent({
setup() {
let person = reactive({
name: '张三',
age: 18,
job: {
j1: {
salary: 20,
},
},
})
return {
//person,
//name:person.name, //直接取出来的不是响应式的!!!
//name:ref(person.name), //修改的不是源数据,是自己创建的数据!!!
...toRefs(person), //将reactive中的每一组key,value都展示出来(注意,只展示第一层)
}
},
})
</script>
|
- watch监视toRefs数据的小例子
- watch可以监视ref的数据
- watch可以监视reactive的数据
- watch可以监视一个函数,返回一个值的数据
- watch可以监视上面所有的数据组成的数组数据
1
2
3
4
5
6
7
8
9
10
11
12
13
14
15
16
17
18
19
20
21
22
23
24
25
26
27
28
29
30
31
32
33
34
35
36
37
38
39
40
41
42
43
44
45
46
47
48
49
50
51
52
53
54
55
56
57
58
59
60
61
62
63
64
65
66
67
68
69
70
71
72
73
74
75
76
77
78
| <template>
<h2>watch监视toRefs数据</h2>
<h3>count:{{count}}</h3>
<h3>state1:{{state1}}</h3>
<h3>msg:{{msg}}</h3>
<h3>user:{{user}}</h3>
<button @click="updateData">更新数据</button>
</template>
<script lang="ts">
// 引入定义组件的api
import { defineComponent, ref, reactive, watch,toRefs } from 'vue'
// 接口:可以理解为对象的类型,类的类型,函数的类型
// 接口:可以理解为是一种限制,或者是一种能力,一种约束
// 定义一个接口
interface StateData {
msg: string
user: {
name: string
}
cars: string[]
}
// 定义组件并暴露
export default defineComponent({
name: 'App',
setup() {
// 定义ref类型的数据
const count = ref(10)
// watch监视一个ref数据
watch(count, () => {
console.log('count数据变化了')
})
// 定义reactive的响应式对象数据
const state1:StateData=reactive({
msg:'哈哈',
user:{
name:'小甜甜'
},
cars:['奔驰','宝马','奥迪']
})
// watch监视一个reactive数据
watch(state1,()=>{ // 自动开启深度监视
console.log('state1数据变化了')
})
// watch监视一个函数返回值数据
// watch(()=>state1.msg,()=>{
// console.log('state1数据变化了')
// })
const state2 = toRefs(state1)
// watch监视多个数据
// state2是基本类型对象数据,不是ref也不是reactive定义的响应式对象数据,但是state2.user.name修改的是state1中的数据,这个数据变化了,影响了state2对象中的数据,所以,监视就有效的触发了。
// 单独监视state2,监视是不会触发的。
watch([count,()=>state1.msg,state2],()=>{
console.log('监视多个数据')
})
const updateData = () => {
// count.value += 10
// 深度修改数据
// state1.msg+='===='
// state1.user.name+='===='
// state2.msg.value+='==='
}
return {
count,
updateData,
// state1
// ...state1 // 不是响应式的数据
...state2
}
}
})
</script>
reactive定义的是响应式的对象数据,是Proxy类型的
里面的属性并不是响应式的,如果修改了属性值,实际上是在修改该响应式对象的数据,所以,页面会重新渲染。
如果reactive定义的响应式对象数据,内部的属性如果也是响应式的,那么解构后,模版中可以直接使用,但是里面的属性不是响应式的,所以,一旦修改了属性值,解构后的属性在页面中是不会发生变化的,页面也不会重新渲染。
为了简化代码,把当前响应式对象数据进行解构,结果发现:解构后的属性不是响应式的,如何解决?
使用toRefs方法----组合api方法
toRefs的作用:把响应式对象数据转成普通类型的数据,但是,这个数据也是响应式的,而且,内部的属性都是Ref类型的数据,Ref类型的数据都是响应式的数据,所以,即使,把当前的toRefs转换的数据解构了,里面的属性仍然是响应式的,页面可以直接使用,也会重新渲染。
|
9. ref获取元素
利用ref函数获取组件中的标签元素
ref属性:右侧这里需要的是字符串或者**函数 **
如果用于普通 DOM 元素,引用将是元素本身;如果用于子组件,引用将是子组件的实例
用法:声明一个同名ref对象:用来获取页面DOM
ref对象的名字需要与模板ref属性值名字一致
功能需求: 让输入框自动获取焦点
1
2
3
4
5
6
7
8
9
10
11
12
13
14
15
16
17
18
19
20
21
22
23
24
| <template>
<h2>ref的另一个作用:可以获取页面中的元素</h2>
<input type="text" ref="inputRef" />
</template>
<script lang="ts">
import { defineComponent, onMounted, ref } from 'vue'
export default defineComponent({
name: 'App',
// 需求:当页面加载完毕后,页面中的文本框可以直接获取焦点(自动获取焦点)
setup() {
// 默认是空的,页面加载完毕,说明组件已经存在了,获取文本框元素
const inputRef = ref<HTMLElement | null>(null)
// 页面加载后的生命周期组合API
onMounted(() => {
inputRef.value && inputRef.value.focus() // 自动获取焦点
})
return {
inputRef,
}
},
})
</script>
|
其它 Composition API
1. shallowReactive 与 shallowRef
2. readonly 与 shallowReadonly
- readonly: 让一个响应式数据变为只读的(深只读)。
- shallowReadonly:让一个响应式数据变为只读的(浅只读)。
- 应用场景: 不希望数据被修改时。例如,使用比人的组件时使用,
3. toRaw 与 markRaw
- toRaw:
- 作用:将一个由
reactive生成的响应式对象转为普通对象。对ref类型的响应式数据不生效
- 使用场景:用于读取响应式对象对应的普通对象,对这个普通对象的所有操作,不会引起页面更新。
- markRaw:
- 作用:标记一个对象,使其永远不会再成为响应式对象。
- 应用场景:
- 有些值不应被设置为响应式的,例如复杂的第三方类库等。(响应式的数据,在添加一个属性时,这个属性也是响应式的)
- 当渲染具有不可变数据源的大列表时,跳过响应式转换可以提高性能。
4. customRef
5. provide 与 inject
6. 响应式数据的判断
- isRef: 检查一个值是否为一个 ref 对象
- isReactive: 检查一个对象是否是由
reactive 创建的响应式代理
- isReadonly: 检查一个对象是否是由
readonly 创建的只读代理
- isProxy: 检查一个对象是否是由
reactive 或者 readonly 方法创建的代理
新的组件
1.Fragment
- 在Vue2中: 组件必须有一个根标签
- 在Vue3中: 组件可以没有根标签, 内部会将多个标签包含在一个Fragment虚拟元素中
- 好处: 减少标签层级, 减小内存占用
2.Teleport
3.Suspense(还不稳定)
其他
1.全局API的转移
Vue 2.x 有许多全局 API 和配置。
例如:注册全局组件、注册全局指令等。
1
2
3
4
5
6
7
8
9
10
11
12
|
Vue.component('MyButton', {
data: () => ({
count: 0
}),
template: '<button @click="count++">Clicked {{ count }} times.</button>'
})
Vue.directive('focus', {
inserted: el => el.focus()
}
|
Vue3.0中对这些API做出了调整:
2.其他改变
生命周期
1. vue2.x的生命周期
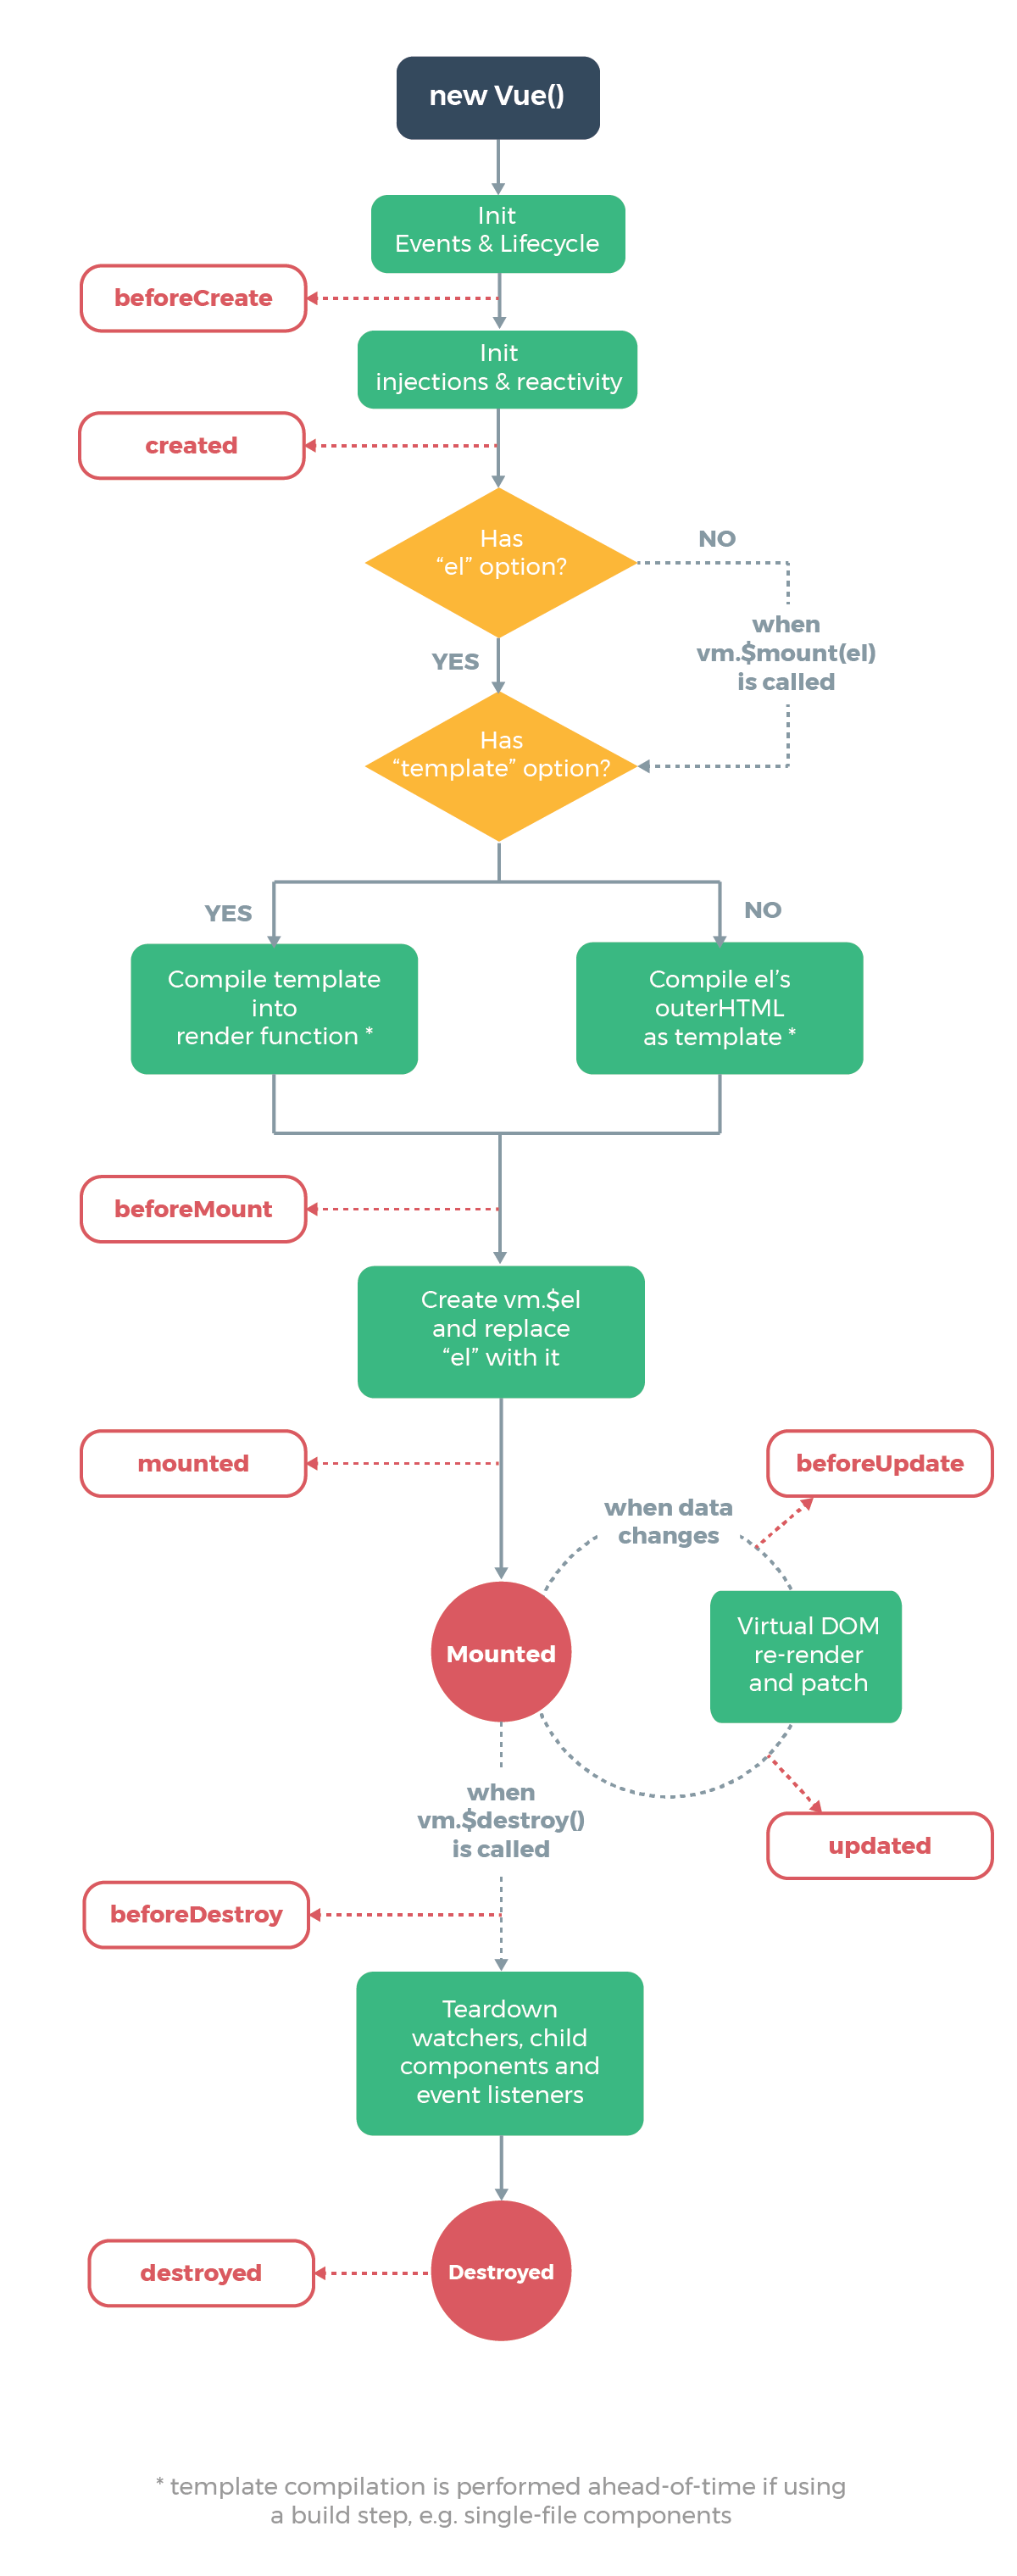
2. vue3的生命周期

3.生命周期对比
与 2.x 版本生命周期相对应的组合式 API
beforeCreate -> 使用 setup()created -> 使用 setup()beforeMount -> onBeforeMountmounted -> onMountedbeforeUpdate -> onBeforeUpdateupdated -> onUpdatedbeforeDestroy -> onBeforeUnmountdestroyed -> onUnmountederrorCaptured -> onErrorCaptured
// 2.0中为 beforeDestroy 和 destroyed
- beforeUnmount -> onBeforeUnmount
- unMounted -> onUnmounted
// 用于处理错误
- errorCaptured -> onErrorCaptured
// 组合式 API 还提供了以下调试钩子函数:
- renderTracked -> onRenderTracked
- renderTriggered -> onRenderTriggered
1
2
3
4
5
6
7
8
9
10
11
12
13
14
15
16
17
18
19
20
21
22
23
24
25
26
27
28
29
30
31
32
33
34
35
36
37
38
39
40
41
42
43
44
45
46
47
48
49
50
51
52
53
54
55
56
57
58
59
60
61
62
63
64
65
66
67
68
69
70
71
72
73
74
75
76
77
78
79
80
81
82
83
84
85
86
87
88
89
90
91
92
93
94
95
96
97
98
99
100
101
102
103
104
105
| <!--App父级组件-->
<template>
<h2>App父级组件</h2>
<button @click="isShow=!isShow">显示和隐藏</button>
<hr>
<Child v-if="isShow" />
</template>
<script lang="ts">
import Child from './components/Child.vue'
import { defineComponent,ref } from 'vue'
export default defineComponent({
name: 'App',
// 注册组件
components: {
Child
},
setup() {
const isShow = ref(true)
return {
isShow
}
}
})
</script>
<!--Child子级组件-->
<template>
<h2>子级组件</h2>
<h3>{{msg2}}</h3>
<button @click="msg2+='==='">更改数据</button>
</template>
<script lang="ts">
import {
defineComponent,
onBeforeMount,
onBeforeUnmount,
onBeforeUpdate,
onMounted,
onUnmounted,
onUpdated,
ref
} from 'vue'
export default defineComponent({
name: 'App',
beforeCreate() {
console.log('2.x===beforeCreate====执行了')
},
created() {
console.log('2.x===created====执行了')
},
beforeMount() {
console.log('2.x===beforeMount====执行了')
},
mounted() {
console.log('2.x===mounted====执行了')
},
beforeUpdate() {
console.log('2.x===beforeUpdate====执行了')
},
updated() {
console.log('2.x===updated====执行了')
},
// beforeDestroy() {
// console.log('2.x===beforeDestroy====执行了')
// },
// destroyed() {
// console.log('2.x===destroyed====执行了')
// },
beforeUnmount() {
console.log('2.x===beforeUnmount====执行了')
},
unmounted() {
console.log('2.x===unmounted====执行了')
},
// vue3.x的组件中,支持vue2.x的生命周期,但是有两个废掉了
setup() {
console.log('3.x的setup')
const msg2 = ref('xxx')
// setup函数相当于beforeCreate和created这两个生命周期
onBeforeMount(() => {
console.log('3.x===onBeforeMount====执行了')
})
onMounted(() => {
console.log('3.x===onMounted====执行了')
})
onBeforeUpdate(() => {
console.log('3.x===onBeforeUpdate====执行了')
})
onUpdated(() => {
console.log('3.x===onUpdated====执行了')
})
onBeforeUnmount(() => {
console.log('3.x===onBeforeUnmount====执行了')
})
onUnmounted(() => {
console.log('3.x===onUnmounted====执行了')
})
return {
msg2
}
}
})
</script>
|
自定义hooks函数
1. compostion API VS Option API
理解自定义Hook
需求1
- 收集用户鼠标点击的页面坐标
- hooks/useMousePosition.ts
1
2
3
4
5
6
7
8
9
10
11
12
13
14
15
16
17
18
19
20
21
22
23
24
25
26
27
|
import { onBeforeUnmount, onMounted, ref } from 'vue'
export default function () {
const x = ref(-1)
const y = ref(-1)
const clickHandler = (event: MouseEvent) => {
x.value = event.pageX
y.value = event.pageY
}
onMounted(() => {
window.addEventListener('click', clickHandler)
})
onBeforeUnmount(() => {
window.removeEventListener('click', clickHandler)
})
return {
x,
y
}
}
|
1
2
3
4
5
6
7
8
9
10
11
12
13
14
15
16
17
18
19
20
21
| <template>
<h2>自定义hook函数操作</h2>
<h2>x:{{ x }},y:{{ y }}</h2>
<hr />
</template>
<script lang="ts">
import { defineComponent, watch } from 'vue'
import useMousePosition from './hooks/useMousePosition'
export default defineComponent({
name: 'App',
// 需求1:用户在页面中点击页面,把点击的位置的横纵坐标收集起来并展示出来
setup() {
const { x, y } = useMousePosition()
return {
x,
y
}
},
})
</script>
|
需求2:
1
2
3
4
5
6
7
8
9
10
11
12
13
14
15
16
17
18
19
20
21
22
23
24
25
26
27
28
|
import { ref } from 'vue'
import axios from 'axios'
export default function useUrlLoader(url: string) {
const result = ref()
const loading = ref(true)
const errorMsg = ref()
axios.get(url)
.then(response => {
loading.value = false
result.value = response.data
})
.catch(e => {
loading.value = false
errorMsg.value = e.message || '未知错误'
})
return {
loading,
result,
errorMsg,
}
}
|
在组件中使用自定义hooks
1
2
3
4
5
6
7
8
9
10
11
12
13
14
15
16
17
18
19
20
21
22
23
24
25
26
27
28
29
30
31
32
33
34
| <template>
<div class="about">
<h2>x: {{x}}, y: {{y}}</h2>
<hr>
<h2 v-if="loading">LOADING...</h2>
<h2 v-else-if="errorMsg">{{errorMsg}}</h2>
<img v-if="result" :src="result.message" alt="">
</div>
</template>
<script lang="ts">
import {
ref
} from "vue"
import useMousePosition from '../hooks/useMousePosition'
import useUrlLoader from '../hooks/useUrlLoader'
export default {
setup() {
const {x, y} = useMousePosition()
const {loading, result, errorMsg} = useUrlLoader('https://dog.ceo/api/breeds/image/random')
return {
x,
y,
loading,
result,
errorMsg
}
}
}
</script>
|
泛型强化类型检查
1
2
3
4
5
6
7
8
9
10
11
12
13
14
15
16
17
18
19
20
21
22
23
24
25
26
27
28
| import { ref } from 'vue';
import axios from 'axios'
export default function <T>(url: string) {
const loading = ref(true)
const data = ref<T | null>(null)
const errorMsg = ref('')
axios.get(url).then(response => {
loading.value = false
data.value = response.data
}).catch(error => {
loading.value = false
errorMsg.value = error.message || '未知错误'
})
return {
loading,
result,
errorMsg
}
}
|
1
2
3
4
5
6
7
8
9
10
11
12
13
14
15
16
17
18
19
20
21
22
23
24
25
26
27
28
29
30
31
32
33
34
35
36
37
38
39
40
41
42
43
44
45
46
47
| <template>
<div class="about">
<h2>x: {{x}}, y: {{y}}</h2>
<hr>
<h2 v-if="loading">LOADING...</h2>
<h2 v-else-if="errorMsg">{{errorMsg}}</h2>
<img v-if="result" :src="result[0].url" alt="">
</div>
</template>
<script lang="ts">
import {
ref, watch
} from "vue"
import useMousePosition from '../hooks/useMousePosition'
import useUrlLoader from '../hooks/useUrlLoader'
interface DogResult {
message: string
status: string
}
interface CatResult {
id: string
url: string
width: number
height: number
}
export default {
setup() {
const {x, y} = useMousePosition()
// const {loading, result, errorMsg} = useUrlLoader<DogResult>('https://dog.ceo/api/breeds/image/random')
const {loading, result, errorMsg} = useUrlLoader<CatResult[]>('https://api.thecatapi.com/v1/images/search')
return {
x,
y,
loading,
result,
errorMsg
}
}
}
</script>
|
响应式数据的判断方式:
1
2
3
4
5
6
7
8
9
10
11
12
13
14
15
16
17
18
19
20
21
22
23
24
25
26
27
28
| <template>
<h2>响应式数据的判断</h2>
</template>
<script lang="ts">
import { defineComponent, isProxy, isReactive, isReadonly, isRef, reactive, readonly, ref } from 'vue'
export default defineComponent({
name:'App',
// isRef: 检查一个值是否为一个 ref 对象
// isReactive: 检查一个对象是否是由 reactive 创建的响应式代理
// isReadonly: 检查一个对象是否是由 readonly 创建的只读代理
// isProxy: 检查一个对象是否是由 reactive 或者 readonly 方法创建的代理
setup(){
// isRef: 检查一个值是否为一个 ref 对象
console.log(isRef(ref({})))
// isReactive: 检查一个对象是否是由 reactive 创建的响应式代理
console.log(isReactive(reactive({})))
// isReadonly: 检查一个对象是否是由 readonly 创建的只读代理
console.log(isReadonly(readonly({})))
// isProxy: 检查一个对象是否是由 reactive 或者 readonly 方法创建的代理
console.log(isProxy(readonly({})))
console.log(isProxy(reactive({})))
return{}
}
})
</script>
|
VueRouter4的使用
1. 了解vue-router4相关信息
Vue Router 是 Vue.js 的官方路由。它与 Vue.js 核心深度集成,让用 Vue.js 构建单页应用变得轻而易举。功能包括:
- 嵌套路由映射
- 动态路由选择
- 模块化、基于组件的路由配置
- 路由参数、查询、通配符
- 展示由 Vue.js 的过渡系统提供的过渡效果
- 细致的导航控制
- 自动激活 CSS 类的链接
- HTML5 history 模式或 hash 模式
- 可定制的滚动行为
- URL 的正确编码
2. 安装vue-router4
Vue Router 是 Vue.js 的官方路由。它与 Vue.js 核心深度集成,让用 Vue.js 构建单页应用变得轻而易举。功能包括:
2. 配置vite
1
2
3
4
5
6
7
8
9
10
11
12
13
14
15
16
17
18
19
20
21
22
23
24
25
26
27
28
29
30
31
32
33
34
35
| tsconfig.json 中新增
"compilerOptions": {
"baseUrl": "./",
"paths": {
"@/*":["./src/*"]
}
},
package.json中修改
"scripts": {
"dev": "vite --host 0.0.0.0 --port 3001",
"build": "vue-tsc --noEmit && vite build",
"preview": "vite preview"
},
或者 vite.config.ts中配置
import { resolve } from 'path'
export default defineConfig({
plugins: [vue()],
server: {
host:'0.0.0.0',
port:3001
},
resolve: {
alias: {
'@': resolve(__dirname, "src")
},
extensions: [".ts", ".vue", ".js", ".jsx", ".tsx"],
}
}
|
3. vue-router4router-link和router-view为什么能够直接用
安装router插件的时候注册了这两个全局组件,所以能直接使用。
1
2
3
4
5
| 在node_modules目录中的.vite目录中的deps目录中:vue-router.js中
install(app) {
const router2 = this;
app.component("RouterLink", RouterLink);
app.component("RouterView", RouterView);
|
4. 使用vue-router4及hash和history模式
Hash模式的URL中有一个#号,http://localhost:3000/#/home号后面的就是Hash地址,这个模式以前是SPA的常用模式,但是链接有一个#号比较难看。
H5模式和正常的链接地址一样的,http://localhost:3000/home, 这个地址大家都能正常的接受,但是得需要服务器支持。 原因是浏览器中输入http://localhost:3000/home支持,服务器以为要访问根路劲下的home目录的HTML文件,而不是访问根路径下的HTML文件。
webpack和vite启动的服务器是支持HTML5模式的,所以开发环境使用HTML5模式没有问题。
1
2
3
4
5
| const router = createRouter({
history:createWebHistory(),
routes,
})
|
5. vue-router4选中样式linkActiveClass
1
2
3
4
| const router = createRouter({
routes,
linkActiveClass:'my-router-active'
})
|
1
2
3
4
5
6
7
| index.html中的header标签中
<style>
.my-router-active {
color: #d43c33 !important;
background-color: #02a774 !important;
}
</style>
|
6. vue-router4参数(query和params)
1
2
3
4
5
6
7
8
| query参数传递:
<router-link :to="{name: 'detail', query: {id: m.id}}">Message</router-link>
query参数接收:
<script lang="ts" setup>
import { useRoute } from 'vue-router'
const route = useRoute() // 路由信息对象
const id = route.query.id
</script>
|
1
2
3
4
5
6
7
8
9
10
11
12
13
14
15
16
17
18
19
20
21
22
23
24
25
26
27
28
| 动态路由:
routes.ts中
{
name: 'detail',
path: '/about/message/detail/:id',
component:MessageDetail
}
:id 表示 路由的路径是动态的
给组件传递props
前面在组件中需要使用useRoute()获取到路由,然后获取对应的route.params, 我们可以通过另外一种方式获取route.params。
路由添加props属性
{
name: 'detail',
path: '/about/message/detail/:id',
component:MessageDetail,
props: (route) => ({id:route.params.id,name:route.query.name})
}
组件种获取props方式传递的参数
const props = defineProps({
id:{
type:number,
required:true
}
})
|
1
2
3
4
5
6
7
8
9
10
| params参数传递:
<router-link :to="`/about/message/detail/${m.id}`">Message</router-link>
<router-link :to="{name: 'detail', params: {id: m.id}}">Message</router-link>
params参数接收:
<script lang="ts" setup>
import { useRoute } from 'vue-router'
const route = useRoute() // 路由信息对象
const id = route.params.id
</script>
通过route.params.id就能获取到传递的id
|
7. vue-router4禁止路由复用和404
有时候用户可能输入一个根本不存在的路劲(例如:http://localhost:3000/xxx),此时最好是给显示个默认的404页面,这样是为了提升用户体验。
1
2
3
4
5
6
7
8
| 注意,这个404的路由一定要放在最后,否则容易出现问题
{
path:'/:pathMatch(.*)*',
name:'NotFound',
component:()=>import('@/pages/404.vue')
}
404.vue中
随便写内容
|
8. vue-router4案例
1
2
3
4
5
6
7
8
9
| public中css目录中的bootstrap.css文件
配置index.html
<link rel="stylesheet" href="/css/bootstrap.css">
<style>
.router-link-active {
color: #d43c33 !important;
background-color: #02a774 !important;
}
</style>
|
路由配置代码
1
2
3
4
5
6
7
8
9
10
11
12
13
14
15
16
17
18
19
20
21
22
23
24
25
26
27
28
29
30
31
32
33
34
35
36
37
38
39
40
41
42
43
44
45
46
47
48
49
50
51
52
53
54
55
56
57
58
59
60
61
62
63
64
65
66
67
68
69
70
71
72
73
74
| router.ts中
import { createRouter, createWebHashHistory, createWebHistory } from 'vue-router'
import routes from './routes'
const router = createRouter({
history:createWebHistory(),
routes,
scrollBehavior() {
return {
left: 0,
top: 0
}
}
})
export default router
routes.ts中
import { RouteRecordRaw } from 'vue-router'
import News from '@/pages/News.vue'
import Message from '@/pages/Message.vue'
import MessageDetail from '@/pages/MessageDetail.vue'
const Home = () => import('@/pages/Home.vue')
const About = () => import('@/pages/About.vue')
const routes: RouteRecordRaw[] = [
{
path: '/home',
component: Home
}, {
path: '/',
redirect: '/home'
}, {
path: '/about',
component: About,
children: [
{
name: 'news',
path: '/about/news',
component:News
}, {
path:'message',
component: Message,
children: [
{
name: 'detail',
path: '/about/message/detail/:id',
component:MessageDetail,
props: (route) => ({id:route.params.id,name:route.query.name})
}
]
}, {
path: '',
redirect:'/about/news'
}
]
}
]
export default routes
|
各个组件种代码
1
2
3
4
5
6
7
8
9
10
11
12
13
14
15
16
17
18
19
20
21
22
23
24
25
26
27
28
29
30
31
32
33
34
35
36
37
38
39
40
41
42
43
44
45
46
47
48
49
50
51
52
53
54
55
56
57
58
59
60
61
62
63
64
65
66
67
68
69
70
71
72
73
74
75
76
77
78
79
80
81
82
83
84
85
86
87
88
89
90
91
92
93
94
95
96
97
98
99
100
101
102
103
104
105
106
107
108
109
110
111
112
113
114
115
116
117
118
119
120
121
122
123
124
125
126
127
128
129
130
131
132
133
134
135
136
137
138
139
140
141
142
143
144
145
146
147
148
149
150
151
152
153
154
155
156
157
158
159
160
161
162
163
164
165
166
167
168
169
170
171
172
173
174
175
176
177
178
179
180
181
| App.vue中进行配置
<div>
<div class="row">
<div class="col-xs-offset-2 col-xs-8">
<div class="page-header">
<h2>Router Basic</h2>
</div>
</div>
</div>
<div class="row">
<div class="col-xs-2 col-xs-offset-2">
<div class="list-group">
<!-- 路由链接 -->
<!--<router-link to="路径" class="list-group-item">About</router-link>-->
<!--<router-link to="路径" class="list-group-item">Home</router-link>-->
</div>
</div>
<div class="col-xs-6">
<div class="panel">
<div class="panel-body">
<!--路由视图-->
<!--<router-view />-->
<!-- <router-view v-slot="{Component}">
Vue Router4 的转场动画的实现 和 以前的版本有些不一致。需要将transition 包含在router-view, 如下所示:
<transition>
<keep-alive>
<component :is="Component" />
</keep-alive>
</transition>
</router-view> -->
</div>
</div>
</div>
</div>
</div>
Home.vue中
<template>
<h3>Home页面</h3>
</template>
<script lang="ts">
export default {
name: 'Home'
}
</script>
<script lang="ts" setup></script>
<style scoped></style>
About.vue中
<template>
<h3>About页面</h3>
<ul class="nav nav-tabs">
<li><router-link :to="{name:'news'}">News</router-link></li>
<li><router-link to="/about/message">Message</router-link></li>
</ul>
<router-view></router-view>
</template>
<script lang="ts">
export default {
name:'About'
}
</script>
<script lang="ts" setup></script>
<style scoped></style>
Message.vue中
<template>
<div>
<!--message数据列表-->
<ul>
<li v-for="(m,index) in messages" :key="m.id">
<!-- <router-link :to="`/about/message/detail/${m.id}`">{{m.title}}</router-link> -->
<router-link :to="{name: 'detail', params: {id: m.id}}">{{m.title}}</router-link>
-- <button @click="pushShow(m.id)">push查看</button>
-- <button @click="replaceShow(m.id)">replace查看</button>
</li>
</ul>
<button @click="$router.back()">返回</button>
<button @click="$router.forward()">前进</button>
<hr>
<router-view></router-view>
</div>
</template>
<script lang="ts">
export default {
name: 'Message'
}
</script>
<script lang="ts" setup>
// 引入页面加载的钩子和ref
import { onMounted, ref } from 'vue'
// 引入路由器对象
import { useRouter } from 'vue-router'
// 定义接口,限制对象的数据类型
interface Message {
id: number
title: string
}
// 定义数据
const messages = ref<Message[]>([])
// 页面加载完毕后的钩子
onMounted(() => {
setTimeout(() => {
const data: Message[] = [
{ id: 1, title: 'message001' },
{ id: 2, title: 'message002' },
{ id: 3, title: 'message003' }
]
messages.value = data
}, 1000)
})
// 获取路由器对象
const router = useRouter()
const pushShow = (id: number) => {
// router.push({ name: 'detail', params: { id } })
router.push(`/about/message/detail/${id}`)
}
const replaceShow = (id: number) => {
router.replace(`/about/message/detail/${id}`)
// router.replace({ name: 'detail', params: { id } })
}
</script>
MessageDetail.vue中
<template>
<ul>
<li>ID:{{$route.params.id}}</li>
<li>Title:{{state.detail.title}}</li>
<li>Content:{{state.detail.content}}</li>
</ul>
</template>
<script lang="ts">
export default {
name: 'MessageDetail'
}
</script>
<script lang="ts" setup>
import { onMounted, reactive,watch } from 'vue'
import { useRoute } from 'vue-router'
// 定义接口
interface MessageDetail {
id: number
title: string
content: string
}
// 定义数据
const messageDetails: MessageDetail[] = [
{ id: 1, title: 'message001', content: 'content001' },
{ id: 2, title: 'message002', content: 'content002' },
{ id: 3, title: 'message003', content: 'content003' }
]
// 定义state对象数据,内部的detail是个对象
const state = reactive<{ detail: MessageDetail }>({
detail: {} as MessageDetail
})
// 或者
// const state = reactive({
// detail:{} as MessageDetail
// })
// 获取路由信息对象
const route = useRoute()
// 页面加载完毕后的钩子
onMounted(() => {
setTimeout(() => {
const id = +route.params.id // 转数字类型
// 根据id查找对应的对象数据
// state.detail = messageDetails.find((detail) => detail.id === id)
}, 1000)
})
// 监视params
watch(()=>route.params,(newParams)=>{
setTimeout(() => {
const id = +newParams.id
state.detail = messageDetails.find((detail) => detail.id === id)
}, 1000);
})
</script>
|
Pinia的使用

1. 了解Pinia相关信息
- Pinia [最初是在 2019 年 11 月左右重新设计使用]。从那时起,最初的原则仍然相同,但 Pinia 对 Vue 2 和 Vue 3 都有效,并且不需要您使用组合 API。
- 类型安全,通过类型推断,可以提供自动完成的功能。
- Pinia 支持扩展,可以非常方便地通过本地存储,事物等进行扩展,模块化设计,通过构建多个存储模块,可以让程序自动拆分它们。
- 去除 mutations,只有 state,getters,actions,actions 支持同步和异步;
代码扁平化没有模块嵌套,只有 store 的概念,store 之间可以自由使用,每一个store都是独立的,无需手动添加 store,store 一旦创建便会自动添加;
2. 为什么要使用 Pinia
Pinia 是 Vue 的存储库,它允许您跨组件/页面共享状态。 如果您熟悉 Composition API,您可能会认为您已经可以通过一个简单的 export const state = reactive({}). 这对于单页应用程序来说是正确的,但如果它是服务器端呈现的,会使您的应用程序暴露于安全漏洞。 但即使在小型单页应用程序中,您也可以从使用 Pinia 中获得很多好处:
- dev-tools 支持
- 跟踪动作、突变的时间线
- Store 出现在使用它们的组件中
- time travel 和 更容易的调试
- 热模块更换
- 在不重新加载页面的情况下修改您的 Store
- 在开发时保持任何现有状态
- 服务器端渲染支持,完整的 ts 的支持。简便,轻巧,只有大约 1kb 的大小。
3. 安装和使用Pinia
下面是Vue 3中的方式
1
2
3
4
5
6
7
8
| yarn add pinia
# 或者使用 npm
npm install pinia
main.ts中
import {createPinia} from 'pinia'
const store = createPinia()
app.use(store)
|
提示:
如果您的应用使用 Vue 2,您还需要安装组合 API:@vue/composition-api。
如果您使用的是 Vue 2,您还需要安装一个插件并将创建的 pinia 注入应用程序的根目录:
1
2
3
4
5
6
7
8
9
10
11
| import { createPinia, PiniaVuePlugin } from 'pinia'
Vue.use(PiniaVuePlugin)
const pinia = createPinia()
new Vue({
el: '#app',
pinia,
})
|
这也将添加 devtools 支持。在 Vue 3 中,仍然不支持时间旅行和编辑等一些功能,因为 vue-devtools 尚未公开必要的 API,但 devtools 具有更多功能,并且整体开发人员体验要好得多。在 Vue 2 中,Pinia 使用 Vuex 的现有接口(因此不能与它一起使用)。
4. 与 Vite中使用Pinia
- 案例1:
- pinia的基本使用
- vue组件中解构后的数据属于非响应式数据,使用storeToRefs
- vue组件中如何修改store中的状态数据:countStore.count,如何修改:countStore.increment
pinia中有 state、actions、getters
state: 管理数据:state右侧是函数,返回一个对象对象里即为仓库里的数据 actions: 处理同步|异步语句|书写业务逻辑|修改state数据getters: 计算属性:简化数据
注意:
创建的小仓库,使用函数 defineStore,且名称 一般使用use 开头
Pinia store 依靠 pinia 实例在所有调用中共享同一个 store 实例。 大多数情况下,只需调用您的“useStore()”(小仓库的名称)函数即可开箱即用
必须要在pinia的实例创建完成,才可以在每个组件中使用useStore(),否则需要将pinia实例重新注入useStore中才能正常使用!!!例如:在路由的前置守卫中使用:
const pinia = createPinia()
const app = createApp(App)
app.use(router)
app.use(pinia)
router.beforeEach((to) => {
// ✅ 这将确保正确的仓库用于当前运行的应用,重新注入pinia的实例
const main = useMainStore(pinia)
if (to.meta.requiresAuth && !main.isLoggedIn) return '/login'
})
1
2
3
4
5
6
7
8
9
10
11
12
13
14
15
16
17
18
19
20
21
22
23
24
25
26
27
28
29
30
31
32
33
34
35
36
37
38
39
40
41
42
43
44
45
46
47
48
49
50
51
52
53
54
55
56
57
58
59
60
61
62
63
64
65
66
67
68
69
70
71
72
73
|
```ts
store目录下index.ts
// 引入创建pinia的createPiniaAPI
import { createPinia } from 'pinia'
// 创建store对象
const store = createPinia()
// 暴露出去
export default store
main.ts文件中:
// 引入createApp
import { createApp } from 'vue'
// 引入App组件
import App from './App.vue'
// 引入store
import store from './store'
// 创建app实例
const app = createApp(App)
// 使用store并挂载
app.use(store).mount('#app')
store目录下counter.ts
// 引入定义store的defineStore
import { defineStore } from 'pinia'
export const useCountStore = defineStore('counter', {
// 定义状态数据
state: () => {
return {
count: 0
}
},
actions: {
// 加的操作
increment(num: number) {
this.count+=num
},
// 减的操作
decrement(num: number) {
this.count-=num
},
// 奇数的加
incrementIfOdd(num: number) {
if (this.count % 2 !== 0) {
this.increment(num)
}
},
// 异步的加
incrementAsync(num: number) {
setTimeout(() => {
this.increment(num)
}, 1000);
}
},
// 计算属性
getters: {
// 奇偶结果
evenOrOdd(): string {
return this.count % 2 === 0 ? '偶数' : '奇数'
},
//箭头函数形式,不能使用this
newCount: (state): number => {
return state.count+2
},
// 使用state和this
getDoubleCount(state): number {
return state.count * 2 + this.newCount
}
}
})
|
1
2
3
4
5
6
7
8
9
10
11
12
13
14
15
16
17
18
19
20
21
22
23
24
25
26
27
28
29
30
31
32
33
34
35
36
37
| CounterShow.vue组件种
<template>
<h3>Pinia案例</h3>
<!--正确书写方式1:-->
<h4>count: {{countStore.count}}, count是: {{countStore.evenOrOdd}}</h4>
<!--正确书写方式2:-->
<h4>count: {{count}}, count是: {{evenOrOdd}}</h4>
<button @click="countStore.increment(1)">increment操作---加</button>
<button @click="countStore.decrement(1)">decrement操作---减</button>
<button @click="countStore.incrementIfOdd(1)">incrementiffOdd操作---奇数加</button>
<button @click="countStore.incrementAsync(2)">incrementAsync操作---异步加</button>
<br>
<h4>计算属性结果:{{newCount}}</h4>
<h4>计算属性结果:{{getDoubleCount}}</h4>
</template>
<script lang="ts">
import { mapState } from 'pinia'
export default {
name: 'CounterShow',
// 不使用setup的写法:
computed: {
// 计算属性可疑从useCountStore中获取到
...mapState(useCountStore, ['newCount'])
}
}
</script>
<script lang="ts" setup>
import { useCountStore } from '../../store/counter'
import { storeToRefs } from 'pinia'
// 获取countStore对象
const countStore = useCountStore()
// 解构,而且是响应式
const { count, evenOrOdd,getDoubleCount } = storeToRefs(countStore)
</script>
<style scoped>
</style>
|
案例2:
1
2
3
4
5
6
7
8
9
10
11
12
13
14
15
16
| import { defineStore } from 'pinia'
export const useUserStore = defineStore({
id: 'user',
state: () => {
return {
name: '小甜甜',
age:18
}
},
getters: {
getAge: (state):number => {
return state.age
}
}
})
|
1
2
3
4
5
6
7
8
9
10
11
12
13
14
15
16
17
18
19
20
21
22
23
24
25
26
27
28
29
30
31
32
33
34
35
36
37
38
39
40
41
42
| UserShow.vue组件种
<template>
<h3>user:{{userStore.name}}----{{userStore.age}}</h3>
<br>
<button @click="userStore.name+='===='">直接修改</button>
<button @click="updateUser1">批量修改:对象方式</button>
<button @click="updateUser2">批量修改:函数方式</button>
<button @click="updateUser3">批量修改:替换方式</button>
</template>
<script lang="ts">
export default {
name: 'UserShow'
}
</script>
<script lang="ts" setup>
import { useUserStore } from '../../store/user'
const userStore = useUserStore()
// 批量修改:对象的方式
const updateUser1 = () => {
userStore.$patch({
name: '小强',
age: 20
})
}
// 批量修改:函数的方式
const updateUser2 = () => {
userStore.$patch((state) => {
state.name = '小美'
state.age = 30
})
}
// 批量修改:替换的方式
const updateUser3 = () => {
userStore.$state = {
name: '大美丽',
age: 33
}
}
</script>
<style scoped>
</style>
|
自己尝试:
1
2
3
4
5
6
7
8
9
10
11
12
13
14
15
16
17
18
19
20
| 即使您不使用组合 API,也可以使用 Pinia(如果您使用的是 Vue 2,您仍然需要安装@vue/composition-api插件)
<script lang="ts">
import { mapStores,mapStores } from 'pinia'
export default {
computed: {
// 获取所有的store
...mapStores(useCountStore, useUserStore),
}),
// 获取某个store中的count数据
...mapWritableState(useCountStore, ['count'])
},
methods: {
getUserName() {
console.log(this.userStore.name)
}
}
}
</script>
|
1
2
3
4
5
6
7
8
9
10
11
12
13
14
15
16
17
18
19
20
21
22
23
24
25
26
27
28
29
30
31
32
33
34
35
| pinia异步请求操作案例:
store/trademark.ts
import { defineStore } from 'pinia'
import axios from 'axios'
interface Trademark {
id: number,
tmName: string,
logoUrl: string
}
export type TrademarkList = Trademark[]
export const useTrademarkStore = defineStore({
id: 'trademarker',
state: () => {
return {
trademarkList: [] as TrademarkList,
total: 0
}
},
actions: {
async getTrademarkList(page: number, limit: number) {
const url = `/app-dev/admin/product/baseTrademark/${page}/${limit}`
const result = await axios.get(url)
const { records, total } = result.data.data
this.trademarkList = records
this.total = total
}
}
})
|
1
2
3
4
5
6
7
8
9
10
11
12
13
14
15
16
17
18
19
20
21
22
23
24
25
26
| Trademark.vue中
<template>
<h3>品牌列表数据</h3>
<ul>
<li v-for="(tm,index) in trademarkStore.trademarkList.splice(3,10)" :key="tm.id">
<span>{{tm.tmName}}</span>
<img :src="tm.logoUrl" alt="" width="100" height="100" />
</li>
</ul>
<h3>总数:{{trademarkStore.total}}</h3>
</template>
<script lang="ts">
export default {
name: 'Trademark'
}
</script>
<script lang="ts" setup>
import { useTrademarkStore } from '../store/trademark'
import { onMounted } from 'vue'
const trademarkStore = useTrademarkStore()
onMounted(() => {
trademarkStore.getTrademarkList(1, 10)
})
</script>
<style scoped>
</style>
|
4. 与 Vuex 3.x/4.x相比较
Vuex 3.x 是 Vuex 的 Vue 2 而 Vuex 4.x 是 Vue 3
- mutations 不再存在。他们经常被认为是 非常 冗长。他们最初带来了 devtools 集成,但这不再是问题。
- 无需创建自定义复杂包装器来支持 TypeScript,所有内容都是类型化的,并且 API 的设计方式尽可能利用 TS 类型推断。
- 不再需要注入、导入函数、调用函数、享受自动完成功能!
- 无需动态添加 Store,默认情况下它们都是动态的,您甚至都不会注意到。请注意,您仍然可以随时手动使用 Store 进行注册,但因为它是自动的,您无需担心。
- 不再有 modules 的嵌套结构。您仍然可以通过在另一个 Store 中导入和 使用 来隐式嵌套 Store,但 Pinia 通过设计提供平面结构,同时仍然支持 Store 之间的交叉组合方式。 您甚至可以拥有 Store 的循环依赖关系。
- 没有 命名空间模块。鉴于 Store 的扁平架构,“命名空间” Store 是其定义方式所固有的,您可以说所有 Store 都是命名空间的。
Vue组件通信方式
1
2
3
4
5
6
7
8
9
10
11
12
13
| 1) props
2) vue自定义事件
3) 全局事件总线
4) v-model
5) .sync
6) $attrs与$listeners
7) $ref
8) $children & $parent
9) provide与inject
10) slot
11) vuex
12) pinia
13) pubsub
|
1. props
1). 实现父向子通信: 属性值是非函数
2). 实现子向父通信: 属性值是函数
应用: 最基本, 用得最多的方式
1
2
3
4
5
6
7
8
9
10
11
12
13
14
15
16
17
18
19
20
21
22
23
24
25
26
27
28
29
30
31
32
33
34
35
36
37
38
39
40
41
42
43
44
45
46
| PropsTest组件
<template>
<div class="box">
<h1>组件间通信1: props</h1>
<h3>count:{{count}}</h3>
<button @click="updateCount(10)">更新数据</button>
<hr>
<Child :count="count" :updateCount="updateCount" />
</div>
</template>
<script lang="ts">
export default {
name: 'PropsTest'
}
</script>
<script lang="ts" setup>
import {ref} from 'vue'
import Child from './Child.vue'
const count = ref(0)
const updateCount=(num: number)=>{
count.value+=num
}
</script>
Child组件
<template>
<div class="box">
<h2>Child component</h2>
<h3>count:{{count}}</h3>
<button @click="updateCount(20)">更新数据</button>
</div>
</template>
<script lang="ts">
export default {
name: 'Child'
}
</script>
<script lang="ts" setup>
// 定义接口,限制接收数据的类型
interface Props{
count:number
updateCount(val: number):void
}
// 接收数据
defineProps<Props>()
</script>
|
2. 自定义事件
用来实现子组件向父组件通信
1
2
3
4
5
6
7
8
9
10
11
12
13
14
15
16
17
18
19
20
21
22
23
24
25
26
27
28
29
30
31
32
33
34
35
36
37
38
39
40
41
42
43
44
45
46
47
48
49
50
51
52
53
54
55
56
57
58
59
60
61
62
63
64
65
66
67
68
69
70
71
72
73
74
75
76
77
78
79
80
81
82
83
84
85
86
87
88
89
90
91
92
93
| EventTest.vue组件
<template>
<div class="box">
<!--
区别原生事件与自定义事件
原生事件
原生标签上绑定 / 组件标签上绑定加.native
事件名是特定的一些
事件对象 / $event: 包含事件相关信息的数据对象, 如: pageX/pageY/target/keyCode
自定义事件
组件标签上绑定(不加.native)
事件名是任意名称
事件对象 / $event: $emit分发时指定的数据, 可以是任意类型, 甚至是undefined
-->
<h1>组件间通信2: vue自定义事件</h1>
<h2>原生事件监听</h2>
<button @click="showMsg1">原生事件1</button>
<button @click="showMsg1($event)">原生事件2</button>
<!--vue2.x中需要使用.native修饰-->
<Event1 @click.native="showMsg1" />
<!--vue3.x中不再需要使用.native修饰-->
<Event1 @click="showMsg1" />
<hr />
<h2>自定义事件监听</h2>
<Event2 @click="showMsg2" @xxx="showMsg3" @increment="increment" />
<h3>{{count}}</h3>
</div>
</template>
<script lang="ts">
export default {
name: 'EventTest'
}
</script>
<script lang="ts" setup>
import { ref } from 'vue'
// 引入两个子级组件
import Event1 from './Event1.vue'
import Event2 from './Event2.vue'
// 原生事件所用的回调
const showMsg1 = (event: MouseEvent) => {
console.log(event)
console.log((event.target as HTMLElement).innerHTML)
}
// 自定义事件所需回调(showMsg2和showMsg3和increment)
const showMsg2 = (event: string) => {
console.log(event)
}
const showMsg3 = (event: object) => {
console.log(event)
}
const count = ref(10)
const increment = (num: number) => {
count.value += num
}
</script>
Event1.vue组件
<template>
<div class="box"><h2>Event1组件</h2><span>其它内容</span></div>
</template>
<script lang="ts">export default {name: 'Event1'}</script>
<script lang="ts" setup></script>
Event2.vue组件
<template>
<div class="box">
<h2>Event2组件</h2>
<button @click="$emit('click','小甜甜')">分发自定义事件click</button>
<button @click="$emit('xxx',{name:'小甜甜',age:20})">分发自定义事件xxx</button>
<button @click="$emit('increment',10)">分发自定义事件increment</button>
</div>
</template>
<script lang="ts">
export default {
name: 'Event1'
}
</script>
<script lang="ts" setup>
// 直接接收父级组件传递过来的自定义事件
// 不接收,默认也可以执行,会有冒泡效果
// 接收后,默认的点击就没了
// 第一种接收方式
const emit = defineEmits(['click', 'xxx', 'increment'])
// 第二种接收方式
// defineEmits<{
// (e:'click',val:string):void
// (e:'xxx',val:object):void
// (e:'increment',val:number):void
// }>()
</script>
|
3. eventBus和PubSub
Vue3从实例中移除了 $on、$off 和 $once 方法,所以我们如果希望继续使用全局事件总线,要通过第三方的库:
Vue3官方有推荐一些库:mitt
1
2
3
4
5
6
7
8
9
10
11
12
13
14
15
16
17
18
19
20
21
22
23
24
25
26
27
28
29
30
31
32
33
34
35
36
37
38
39
40
41
42
43
44
45
46
47
48
49
50
51
52
53
54
55
56
57
58
59
60
61
62
63
64
65
66
67
68
69
70
71
72
73
74
75
76
77
78
79
80
81
82
83
84
85
86
87
88
89
| EventBusTest.vue组件
<template>
<div class="box">
<h1>组件间通信3: 全局事件总线</h1>
<Child1 />
<Child2 />
<hr />
<Child3 />
<Child4 />
</div>
</template>
<script lang="ts">
export default {
name: 'EventBusTest'
}
</script>
<script lang="ts" setup>
import Child1 from './Child1.vue'
import Child2 from './Child2.vue'
import Child3 from './Child3.vue'
import Child4 from './Child4.vue'
</script>
Child1.vue组件
<template>
<div class="box">
<h2>Child111 component</h2>
<button @click="clickHandler">给Child2传递数据</button>
</div>
</template>
<script lang="ts">
export default {
name: 'Child1'
}
</script>
<script lang="ts" setup>
import emitter from './utils/bus'
// 点击事件的回调
const clickHandler=()=>{
// 分发时间
emitter.emit('child2Data',{name:'小甜甜',age:20})
}
</script>
Child2.vue组件
<template>
<div class="box">
<h2>Child222 component</h2>
<h3>传过来的数据:{{user.data}}</h3>
</div>
</template>
<script lang="ts">
export default {
name: 'Child2'
}
</script>
<script lang="ts" setup>
import emitter from './utils/bus'
import { onBeforeUnmount, reactive } from 'vue'
interface User {
name: string
age: number
}
const user = reactive<{ data: User }>({
data: {} as User
})
// 绑定事件
emitter.on('child2Data', (data: User) => {
user.data = data
})
// 组件销毁前
onBeforeUnmount(()=>{
emitter.off('child2Data')
})
</script>
utils/bus.ts文件
import mitt from 'mitt';
const emitter = mitt()
export default emitter
emitter.on('*', (type, e) => console.log(type, e) ) // 监听全部事件的写法
emitter.all.clear() 清除所有事件的写法
|
还有很多的方式,可以直接去npm或者github上查找,最后,就像vue的官网上说的这样:
1
2
3
4
5
6
| 在绝大多数情况下,不鼓励使用全局的事件总线在组件之间进行通信。虽然在短期内往往是最简单的解决方案,但从长期来看,它维护起来总是令人头疼。根据具体情况来看,有多种事件总线的替代方案:
Prop 和事件应该是父子组件之间沟通的首选。兄弟节点可以通过它们的父节点通信。
Provide 和 inject 允许一个组件与它的插槽内容进行通信。这对于总是一起使用的紧密耦合的组件非常有用。
provide/inject 也能够用于组件之间的远距离通信。它可以帮助避免“prop 逐级透传”,即 prop 需要通过许多层级的组件传递下去,但这些组件本身可能并不需要那些 prop。
Prop 逐级透传也可以通过重构以使用插槽来避免。如果一个中间组件不需要某些 prop,那么表明它可能存在关注点分离的问题。在该类组件中使用 slot 可以允许父节点直接为它创建内容,因此 prop 可以被直接传递而不需要中间组件的参与。
|
pubsub-js消息订阅-发布,React和Vue和微信小程序都可以用
1
2
3
4
5
6
7
8
9
10
11
12
13
14
15
16
17
18
19
20
21
22
23
24
25
26
27
28
29
30
31
32
33
34
35
36
37
38
39
40
41
42
43
44
| Child3.vue组件
<template>
<div class="box">
<h2>Child333 component</h2>
<h3>msg:{{msg}}</h3>
</div>
</template>
<script lang="ts">
export default {
name: 'Child3'
}
</script>
<script lang="ts" setup>
import PubSub from 'pubsub-js'
import {ref,onMounted,onBeforeUnmount} from 'vue'
const msg = ref('abc')
onMounted(()=>{ // 组件挂载后
// 订阅消息
PubSub.subscribe('updateMsg',(msgName,data)=>{
msg.value += data
})
})
onBeforeUnmount(()=>{ // 组件销毁前
PubSub.unsubscribe('updateMsg') // 取消订阅
})
</script>
Child4.vue组件
<template>
<div class="box">
<h2>Child4 component</h2>
<button @click="PubSub.publish('updateMsg','狗蛋')">更新兄弟组件数据</button>
</div>
</template>
<script lang="ts">
export default {
name: 'Child4'
}
</script>
<script lang="ts" setup>
import PubSub from 'pubsub-js'
</script>
|
4. v-model
v-model的本质是input事件+动态value属性,这种方式是在vue2中
vue3中,v-model的本质是动态modelValue+update:modelValue事件
1
2
3
4
5
6
| 非兼容:用于自定义组件时,v-model prop 和事件默认名称已更改:
prop:value -> modelValue;
事件:input -> update:modelValue;
非兼容:v-bind 的 .sync 修饰符和组件的 model 选项已移除,可在 v-model 上加一个参数代替;
新增:现在可以在同一个组件上使用多个 v-model 绑定;
新增:现在可以自定义 v-model 修饰符。
|
1
2
3
4
5
6
7
8
9
10
11
12
13
14
15
16
17
18
19
20
21
22
23
24
25
26
27
28
29
30
31
32
33
34
35
36
37
38
39
40
41
42
43
44
45
46
47
48
49
50
51
52
53
54
55
56
57
58
59
60
61
62
63
64
65
66
67
68
69
70
71
72
73
74
75
76
77
78
79
80
81
82
83
84
85
86
87
| ModelTest.vue组件
<template>
<div class="box">
<h1>组件间通信4: v-model</h1>
<h2>1. 用在原生标签上</h2>
<!--
原生标签上的本质: 动态value属性 + 原生input监听(将输入的最新值保存到属性上)
-->
<input type="text" v-model="msg1" />
<p>{{msg1}}</p>
<input type="text" :value="msg2" @input="msg2=($event.target as HTMLInputElement).value" />
<p>{{msg2}}</p>
<hr>
<h2>2. 用在组件标签上</h2>
<CustomInput title="消息1" v-model="msg3" />
<p>{{msg3}}</p>
<hr />
<CustomInput title="消息2" :modelValue="msg4" @update:modelValue="msg4=$event" />
<p>{{msg4}}</p>
<hr />
<h2>需求: 自定义方式</h2>
<!--
组件标签上的本质: 动态value属性 + 自定义input监听(将子组件分发数据保存父组件的属性上)
-->
<CustomInput2 title="消息3" v-model:otherProps1="msg5" v-model:otherProps2="msg6" />
<p>{{msg5}}</p>
<p>{{msg6}}</p>
</div>
</template>
<script lang="ts">
export default {
name: 'ModelTest'
}
</script>
<script lang="ts" setup>
import CustomInput from './CustomInput.vue'
import CustomInput2 from './CustomInput2.vue'
import { ref } from 'vue'
const msg1 = ref('abc1')
const msg2 = ref('abc2')
const msg3 = ref('abc3')
const msg4 = ref('abc4')
const msg5 = ref('abc5')
const msg6 = ref('abc6')
</script>
<style scoped>
</style>
CustomInput.vue组件
<template>
<div class="box">
<span style="margin-right: 10px">{{title}}</span>
<input type="text" :value="modelValue" @input="$emit('update:modelValue', ($event.target as HTMLInputElement).value)"><span>{{modelValue}}</span>
</div>
</template>
<script lang="ts">
export default {
name: 'CustomInput'
}
</script>
<script lang="ts" setup>
defineProps(['title', 'modelValue'])
</script>
CustomInput2.vue组件
<template>
<div class="box">
<span style="margin-right: 10px">{{title}}</span>
<input type="text" :value="otherProps1" @input="$emit('update:otherProps1',($event.target as HTMLInputElement).value)"><span>{{otherProps1}}</span>
<input type="text" :value="otherProps2" @input="$emit('update:otherProps2',($event.target as HTMLInputElement).value)"><span>{{otherProps2}}</span>
</div>
</template>
<script lang="ts">
export default {
name: 'CustomInput'
}
</script>
<script lang="ts" setup>
defineProps(['title','otherProps1','otherProps2'])
</script>
|
5. .sync
v-model可以作为 .sync 修饰符的替代,vue3中.sync干掉了
1
2
3
4
5
6
7
8
9
10
11
12
13
14
15
16
17
18
19
20
21
22
23
24
25
26
27
28
29
30
31
32
33
34
35
36
37
38
39
40
41
42
43
44
45
46
47
48
49
50
51
52
53
54
55
56
57
58
59
60
61
62
63
64
65
66
67
68
69
70
71
72
73
74
75
76
77
78
79
80
81
82
83
84
85
86
87
88
89
90
91
92
93
94
95
96
97
98
99
100
101
| <template>
<div class="box">
<h1>组件间通信5: sync属性修改符,Vue3中已经移除了.sync</h1>
<p>小明的爸爸现在有{{total}}元</p>
<h2>1. 不使用sync修改符</h2>
<Child1 :money="total" @update:money="total=$event" />
<p>{{total}}</p>
<h2>2.使用v-model修改符</h2>
<Child2 v-model:total="total" />
<h2>3. 使用sync修改符</h2>
<Child3 :money.sync="total" />
</div>
</template>
<script lang="ts">
export default {
name: 'SyncTest'
}
</script>
<script lang="ts" setup>
import { ref } from 'vue'
import Child1 from './Child1.vue'
import Child2 from './Child2.vue'
import Child3 from './Child3.vue'
const total = ref(1000)
const title = ref(10000)
</script>
Child1.vue
<template>
<div class="box">
<span>小明每次花100元</span>
<button @click="spendMoney(100)">花钱</button>
爸爸还剩 {{money}}元
</div>
</template>
<script lang="ts">
export default {
name: 'Child2'
}
</script>
<script lang="ts" setup>
interface Props{
money:number
}
// 接收父级组件传递进来的数据
const props = defineProps<Props>()
// 获取分发事件的对象
const emit = defineEmits(['update:money'])
// 点击的回调
const spendMoney=(count:number)=>{
emit('update:money',props.money-count)
}
</script>
Child2.vue
<template>
<div class="box">
<span>小明每次花200元</span>
<button @click="$emit('update:total',total-200)">花爸爸的钱</button>
, 爸爸还剩{{total}} 元
</div>
</template>
<script lang="ts">
export default {
name: 'Child2'
}
</script>
<script lang="ts" setup>
// 接收属性
defineProps(['total'])
// 接收事件
defineEmits(['update:total'])
</script>
Child3.vue
<template>
<div style="background: #ccc; height: 50px;">
<span>小明每次花100元</span>
<button @click="spendMoney(100)">花钱</button>
爸爸还剩 {{money}} 元
</div>
</template>
<script type="text/ecmascript-6">
export default {
name: 'Child',
props: ['money'],
methods: {
spendMoney (count) {
console.log('测试')
this.$emit('update:money', this.money - count)
}
}
}
</script>
|
6. $attrs&$listeners
1
2
3
4
5
6
7
8
9
| 1). $attrs
实现当前组件的父组件向当前组件的子组件通信
它是包含所有父组件传入的标签属性(排除props声明, class与style的属性)的对象
使用: 通过 v-bind="$attrs" 将父组件传入的n个属性数据传递给当前组件的子组件
2). $listeners
实现当前组件的子组件向当前组件的父组件通信
$listeners是包含所有父组件传入的自定义事件监听名与对应回调函数的对象
使用: 通过v-on="$listeners" 将父组件绑定给当前组件的事件监听绑定给当前组件的子组件
应用: 利用它封装了一个自定义的带hover文本提示的el-button
|
vue3中已经干掉了$listeners
1
2
3
4
5
6
7
8
9
10
11
12
13
14
15
16
17
18
19
20
21
22
23
24
25
26
27
28
29
30
31
32
33
34
35
36
37
38
39
40
41
42
43
44
45
46
47
48
49
50
51
52
53
54
55
56
| AttrsListenersTest.vue组件
<template>
<div class="box">
<h1>组件间通信6: $attrs与$listeners</h1>
<h2>需求: 自定义带Hover提示的按钮</h2>
<!-- <el-button type="success" size="small" :icon="Plus">按钮</el-button>
<el-button type="warning" size="default" :icon="Edit">按钮</el-button>
<el-button type="danger" size="large " :icon="Delete">按钮</el-button> -->
<HintButton title="增加" type="success" size="small" :icon="Plus" @click="add" />
<HintButton title="修改" type="warning" size="default" :icon="Edit" @click="update" />
<HintButton title="删除" type="danger" size="large " :icon="Delete" @click="del" />
</div>
</template>
<script lang="ts">
export default {
name: 'AttrsListenersTest'
}
</script>
<script lang="ts" setup>
import {Plus,Edit,Delete} from '@element-plus/icons-vue'
import HintButton from './HintButton.vue'
const add=()=>{
console.log('增加')
}
const update=()=>{
console.log('修改')
}
const del=()=>{
console.log('删除')
}
</script>
HintButton.vue 组件
<template>
<el-tooltip effect="dark" :content="title" placement="top-start">
<el-button v-bind="$attrs">按钮</el-button>
</el-tooltip>
</template>
<script lang="ts">
export default {
name: 'HintButton'
}
</script>
<script lang="ts" setup>
import {useAttrs} from 'vue'
// 使用props的方式接收传递进来的属性数据
defineProps(['title'])
// 获取没有被props接收到的数据
const attrs = useAttrs()
// 输出没有使用props接收的数据和事件
console.log(attrs)
</script>
|
7. $refs & $parent & defineExpose
1
2
3
4
5
6
7
8
9
10
11
| 1). ref
实现父组件向指定子组件通信
ref是包含所有有ref属性的标签对象或组件对象的容器对象
使用: 通过
const sonRef = ref<InstanceType<typeof Son> | null>(null)
得到子组件对象, 从而可以直接更新其数据或调用其方法更新数据
2). defineExpose({ receiveMoney}) 暴露当前组件方法
3). $parent
实现子组件向父组件通信
$parent是当前组件的父组件对象
使用: 通过$parent 得到父组件对象, 从而可以更新父组件的数据
|
1
2
3
4
5
6
7
8
9
10
11
12
13
14
15
16
17
18
19
20
21
22
23
24
25
26
27
28
29
30
31
32
33
34
35
36
37
38
39
40
41
42
43
44
45
46
47
48
49
50
51
52
53
54
55
56
57
58
59
60
61
62
63
64
65
66
67
68
69
70
71
72
73
74
75
76
77
78
79
80
81
82
83
84
85
86
87
88
89
90
91
92
93
94
95
96
97
98
99
100
101
102
103
104
105
106
107
108
109
110
| RefChildrenParent.vue组件
<template>
<div class="box">
<h1>组件间通信7: $ref & $children & $parent</h1>
<p>BABA有存款: {{money}}</p>
<button @click="borrowMoney1(100)">找小明借钱100</button><br>
<button @click="borrowMoney2(150)">找小红借钱150</button><br>
<br>
<Son ref="sonRef" />
<br>
<Daughter ref="dauRef" />
</div>
</template>
<script lang="ts">
export default {
name: 'ChildrenParentTest'
}
</script>
<script lang="ts" setup>
import Son from './Son.vue'
import Daughter from './Daughter.vue'
import { ref } from 'vue'
const money = ref(1000)
// 获取子级组件
const sonRef = ref<InstanceType<typeof Son> | null>(null)
const dauRef = ref<InstanceType<typeof Daughter> | null>(null)
// 借钱方法1
const borrowMoney1 = (num) => {
;(sonRef.value as any)?.borrowMoney(num)
money.value += num
}
// 借钱方法2
const borrowMoney2 = (num: number) => {
;(dauRef.value as any)?.borrowMoney(num)
money.value += num
}
const receiveMoney = (num: number) => {
money.value += num
}
// 向外暴露组件内的方法
defineExpose({
receiveMoney
})
</script>
Son.vue组件
<template>
<div class="box">
<h3>儿子小明: 有存款: {{money}}</h3>
<button @click="giveMoney(50,$parent)">给BABA钱: 50</button>
</div>
</template>
<script lang="ts">
import { defineComponent } from 'vue'
export default defineComponent({
name: 'Son'
})
</script>
<script lang="ts" setup>
import { ref } from 'vue'
const money = ref(30000)
// 借钱方法
const borrowMoney = (num: number) => {
money.value -= num
}
// 给钱方法
const giveMoney = (num: number, parent: any) => {
parent.receiveMoney(num)
money.value -= num
}
// 暴露出去
defineExpose({
borrowMoney
})
</script>
Daughter.vue组件
<template>
<div class="box">
<h3>女儿小红: 有存款: {{money}}</h3>
<button @click="giveMoney(100,$parent)">给BABA钱: 100</button>
</div>
</template>
<script lang="ts">
import {defineComponent} from 'vue'
export default defineComponent({
name: 'Daughter'
})
</script>
<script lang="ts" setup>
import { ref } from 'vue'
const money = ref(20000)
// 借钱方法
const borrowMoney = (num: number) => {
money.value -= num
}
// 给钱方法
const giveMoney = (num: number, parent: any) => {
parent.receiveMoney(num)
money.value -= num
}
// 暴露出去
defineExpose({
borrowMoney
})
</script>
|
8. provide-inject
1
2
3
4
| 1). 实现祖孙组件间直接通信
2). 使用
在祖组件中通过provide('xxx',数据)配置向后代组件提供数据
在后代组件中通过inject()配置来声明接收数据
|
1
2
3
4
5
6
7
8
9
10
11
12
13
14
15
16
17
18
19
20
21
22
23
24
25
26
27
28
29
30
31
32
33
34
35
36
37
38
39
40
41
42
43
44
45
46
47
48
49
50
51
52
53
54
55
56
57
58
59
60
61
| ProvideInjectTest.vue组件
<template>
<div class="box">
<h1>组件间通信8: provide + inject</h1>
<h3>content1:{{state.content1}}</h3>
<button @click="updateContent('==')">更新content1数据</button>
<hr>
<h3>content2:{{state.content2}}</h3>
<button @click="state.content2={name:'大美丽',age:30}">更新content2对象数据</button>
<button @click="state.content2.name+='++++'">更新content2名字数据</button>
<h2>祖组件标题</h2>
<Child />
</div>
</template>
<script lang="ts">
export default {
name: 'ProvideInjectTest'
}
</script>
<script lang="ts" setup>
import Child from './Child.vue'
import { provide, reactive } from 'vue'
const state = reactive({
content1: 'abc',
content2: {
name: '小甜甜',
age: 20
}
})
const updateContent = (msg: string) => {
state.content1 += msg
}
provide('content11', state.content1)
provide('content22', state.content2)
provide('updateContent1', updateContent)
</script>
GrandChild.vue组件
<template>
<div class="box">
<h4>孙组件标题</h4>
<h3>content11:{{content11}}</h3>
<h3>content22:{{content22}}</h3>
<button @click="updateContent1('+++++')">更新父级组件数据</button>
</div>
</template>
<script lang="ts">
export default {
name: 'GrandChild'
}
</script>
<script lang="ts" setup>
import {inject} from 'vue'
const content11 = inject<string>('content11')
const content22 = inject<{name:string,age:number}>('content22')
const updateContent1 =inject<(msg:string)=>void>('updateContent1')
</script>
|
9. slot
1
2
3
4
| 1). 实现父组件向子组件传递标签内容
2). 什么情况下使用作用域插槽?
父组件需要向子组件传递标签结构内容
但决定父组件传递怎样标签结构的数据在子组件中
|
默认插槽:使用时,在组件的对标签中添加结构即可,不需要template
具名插槽
作用域插槽:子组件的数据由父组件提供,子组件的样式由父组件决定
v-slot : 简写:#
1
2
3
4
5
6
7
8
9
10
11
12
13
14
15
16
17
18
19
20
21
22
23
24
25
26
27
28
29
30
31
32
33
34
35
36
37
38
39
40
41
42
43
44
45
46
47
48
49
50
51
52
53
54
55
56
57
58
59
60
61
62
63
64
65
66
67
68
69
70
71
72
73
74
75
76
77
| types.ts
// 暴露接口
export interface User {
id: number
title: string
isComplete:boolean
}
// 暴露类型Users数组
export type Users=User[]
SlotTest.vue组件
<template>
<div class="box">
<h1>组件间通信10: 插槽==> 作用域插槽</h1>
<h2>需求: 自定义TODO列表组件能实现下面需求</h2>
<h2>效果一: 显示TODO列表时, 已完成的TODO为绿色</h2>
<List :todos="todos">
<template v-slot="{row,$index}">
<p :style="{color:row.isComplete?'green':''}">id:{{row.id}}--标题:{{row.title}}--索引:{{$index}}</p>
</template>
</List>
<h2>效果二: 显示TODO列表时, 带序号, TODO的颜色为蓝绿搭配</h2>
<List :todos="todos">
<template v-slot="{row,$index}">
<p :style="{color:$index%2==0?'green':'blue'}">序号:{{$index+1}}--标题:{{row.title}}</p>
</template>
</List>
</div>
</template>
<script lang="ts">
export default {
name: 'SlotTest'
}
</script>
<script lang="ts" setup>
import { ref } from 'vue'
import List from './List.vue'
import type {Users} from './types'
const todos = ref<Users>([
{id:1,title:'AAA',isComplete:false},
{id:2,title:'BBB',isComplete:true},
{id:3,title:'CCC',isComplete:false},
{id:4,title:'DDD',isComplete:false}
])
</script>
List.vue组件
<template>
<div class="box">
<!--
子组件需要向父组件传递数据 ==> 作用域插槽
slot标签的所有属性会自动传递给父组件
-->
<ul>
<li v-for="(todo,index) in todos" :key="todo.id">
<slot :row="todo" :$index="index" />
</li>
</ul>
</div>
</template>
<script lang="ts">
export default {
name: 'List'
}
</script>
<script lang="ts" setup>
// 引入Users数组类型
import type { Users } from './types'
// 定义Props接口
interface Props {
todos: Users
}
// 接收父级组件传递过来的数据
defineProps<Props>()
</script>
|
10. vuex
1
2
3
4
5
6
| 1). 实现任意组件间通信
2). Vuex 是一个专为 Vue 应用程序设计的管理多组件共享状态数据的 Vue 插件
任意组件都可以读取到Vuex中store的state对象中的数据
任意组件都可以通过dispatch()或commit()来触发store去更新state中的数据
一旦state中的数据发生变化, 依赖于这些数据的组件就会自动更新
应用: 前台和后台项目都有用vuex管理组件数据
|
11. pinia
12. 面试题:组件通信方式
组件:具有特定功能效果的集合(html,css,js)—html,css,ts
组件通信:组件和组件之间传递数据,组件和组件的关系:父子关系(直接/间接),兄弟关系,任意关系
组件通信方式有哪些:
props—父子组件通信
自定义事件(Custom Event),—父子组件通信
事件总线($bus—vue2.x的语法,原理是:原型)/mitt–插件,—任意组件通信
消息订阅与发布(pubsub-js),—任意组件通信, —–React/小程序/Vue
v-model(.sync-vue2),—父子组件通信 ,本质:Vue2中(value属性+input事件),Vue3中(modelValue+update:modelValue事件)
$refs和$parent和$children, ——父子组件通信
$attrs和$listeners(vue2中,vue3中没有),—–父子组件通信—高级复用组件—HintButton
provide-inject,—-任意组件通信
slot(默认插槽,具名插槽,作用域插槽),—父子组件通信
vuex,—-任意组件通信(vuex3.x,vuex4.x语法—和pinia很像)
pinia,—-任意组件通信(vue3.x)
组件通信常用的方式有哪些:props,作用域插槽,vuex(pinia),自定义事件,v-model,$attrs
我的项目中用到了哪些,哪一块用到什么方式:pinia,作用域插槽,自定义事件,v-model,$attrs
某些组件通信的原理
扩展:vue中组件通信,使用了很多方式,其实React中也有通信方式,也有组件通信,小程序中有组件通信,页面通信…..
更新
自定义ref
作用:创建一个自定义的ref,并对其依赖项进行跟踪和更新触发进行逻辑控制
customRef
案例:
1
2
3
4
5
6
7
8
9
10
11
12
13
14
15
16
17
18
19
20
21
22
23
24
25
26
27
28
29
30
31
32
| <template>
<div>
<h3>{{ msg }}</h3>
<input type="text" v-model="msg" />
</div>
</template>
<script setup lang="ts">
import { customRef } from "vue";
let initValue = "hello";
let timer: number;
let msg = customRef((track, trigger) => {
return {
get() {
track(); // 告诉vue 追踪依赖
return initValue;
},
set(value) {
clearTimeout(timer);
timer = setTimeout(() => {
trigger(); // 通知vue 数据变化了
initValue = value;
}, 1000);
},
};
});
</script>
<style scoped></style>
|